Kawaii Amigurumi Cats crochet pattern
Materials
Find this pattern in our app with access to row counters, favorites, and much more.
Step by Step Instructions

Step 1
MATERIALS AND TOOLS. • Fine cotton thread (colors depending on the chosen version)

Step 2
• Crochet hook according to the thickness of the yarn (approx. 2.5 – 3 mm or what is necessary to achieve the sample) • Wool needle.
Step 3
• Point marker. • Synthetic filling.

Step 4
• Safety eyes. 10 PROFESSIONAL TIPS FOR KNITTING THIS AMIGURUMI.
Step 5
Use a crochet hook half a size smaller if you want a more compact knit. Maintain a firm, constant tension to prevent the filling from showing through.
Step 6
Always mark the beginning of each lap. Fill firmly but without deforming the piece.
Step 7
Place your eyes before completely closing your head. Embroidering the stripes after weaving allows for greater control of the design.
Step 8
Distribute the filling in small portions to avoid lumps. Secures internal strands well for durability.
Step 9
Lightly block with indirect steam if the cotton allows. If it is for small children, replace safety eyes with embroidery.
Step 10
ABBREVIATIONS. pt(s) = point(s)
Step 11
ch = string. pb = pb.
Step 12
mpa = half pa. pa = pa.
Step 13
pad = pa. pd = pd.
Step 14
jump = skip a point. increase = increase.
Step 15
dis = decrease (invisible decrease) sc3j = 3sc closed together (invisible decrease of 3 points)
Step 16
row(s) = row(s) RS = right side (front of piece)
Step 17
WS = wrong side (back side) back loop = work only in the back loop of the stitch.
Step 18
front loop = work only in the front loop of the stitch. [.] x Number = work the instructions inside the brackets and repeat them the indicated number of times.
Step 19
Example: [2 sc, inc] x 3 means rep the entire sequence 3 times. (.) = work the group of stitches indicated inside the parentheses in the same stitch.
Step 20
(number) = total number of stitches at the end of the round or row. HOW TO KNIT – BASIC TECHNIQUES.
Step 21
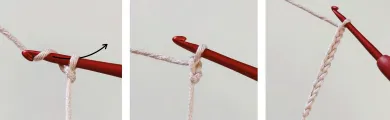
SLIPKNOT. Insert the crochet hook into a loop of yarn.
Step 22
Make a loop and pass it through the loop to form the slip knot. Pull the end of the yarn to gently tighten the hook.
Step 23
BASE CHAIN (ch) Start with a slip knot on the hook.
Step 24
Make a yarn over and pass it through the crochet loop. You now have your first chain. Repeat the process until you obtain the number of chains necessary for the base of the project.
Step 25
sc (sc) Insert the next crochet st.
Step 26
Make a yarn over and pull out a strand (there will be 2 strands left on the hook). Make another yarn over and pass it through the 2 strands.
Step 27
The bp is complete. FRONT STRAND AND BACK STRAND.
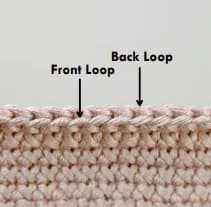
Step 28
Each stitch has two strands on top. • Front strand: the one closest to you.
Step 29
• Back strand: the one furthest from you. Work in front yarn: insert the hook under the front yarn only and complete the indicated stitch.
Step 30
Work in back loop: insert the hook under the back loop only and complete the indicated stitch. These techniques allow you to create texture, reliefs and decorative lines in the fabric.
Step 31
COLOR PATTERN. (see diagrams A1 – A3, 1 square = 1 sc)
Step 32
A1: [1 sc underlined, 2 sc] x 2, 1 sc underlined. A2: [1 sc underlined, 1 sc] x 2, 1 sc underlined.
Step 33
A3: [1 sc underlined, 2 sc] x 3, 1 sc underlined. Normal text in light yellow.
Step 34
Text underlined in orange. (start with light yellow)
Step 35
Make a base ch: Ch 11 Work along the ch, starting in the second chain from the hook.
Step 36
hook: inc, work A1 (= 7 sc) — Read Color Pattern. Let's start with the part: Head. 1 sc, [4 sc] in last chain, work along other side.
Step 37
knit A1, 1 sc, inc. 2 inc, work A1, 1 sc, 4 inc, work A1, 1 sc, 2 inc.
Step 38
2 sc, 2 inc, knit A1, 1 sc, 2 inc, 1 sc, 1 sc underlined, 2 sc, 2 inc. work A1, 1 sc, 2 inc, 2 sc.
Step 39
3 sc, 2 inc, knit A1, 2 sc, 2 inc, knit A2 (= 5 sc) 2 inc, 2 sc, knit A1, 2 sc, 2 inc, 3 sc.
Step 40
4 sc, 2 inc, 2 sc, knit A1, 3 sc, 2 inc, 1 sc, knit A2, 1 sc. 2 inc, 3 sc, knit A1, 3 sc, 2 inc, 4 sc.
Step 41
5 sc, 2 inc, knit A3 (= 10 sc), 8 sc, knit A2, 8 sc, knit A3 1 sc, 2 inc, 5 sc.
Step 42
6 sc, 2 inc, 1 sc, knit A3, 4 sc, 2 inc, 2 sc, knit A2, 2 sc. 2 inc, 4 sc, work A3, 2 sc, 2 inc, 6 sc.
Step 43
11 sc, knit A3, 10 sc, knit A2, 10 sc, knit A3, 12 sc. 11 sc, knit A3, 12 sc, 1 sc underlined, 12 sc, knit A3, 12 sc.
Step 44
11 sc, knit A3, 25 sc, knit A3, 12 sc. 11 sc, knit A3, 5 sc, 2 inc, 12 sc, 2 inc, 4 sc, knit A3, 12 sc.
Step 45
12–16. 11 sc, knit A3, 29 sc, knit A3, 12 sc (5 rows) 14 sc, 1 sc underlined, 2 sc, 1 sc underlined, 35 sc, 1 sc underlined, 2 sc, 1 sc underlined, 15 sc.
Step 46
6 sc, 2 dec, 52 sc, 2 dec, 6 sc. 68 bp.
Step 47
I continue with the complete translation, without skipping any steps and maintaining the same format. 24 sc, 2 dec, 12 sc, 2 dec, 24 sc.
Step 48
21–22. 64 sc (2 rows) ▪ Insert the 6 mm safety eyes between V16 and 17
Step 49
with 12 separation points. 5 sc, 2 dec, 14 sc, 2 dec, 10 sc, 2 dec, 14 sc, 2 dec, 5 sc.
Step 50
56 bp. 4 sc, 2 dec, 12 sc, 2 dec, 8 sc, 2 dec, 12 sc, 2 dec, 4 sc.
Step 51
3 sc, 2 dec, 10 sc, 2 dec, 6 sc, 2 dec, 10 sc, 2 dec, 3 sc. ▪ Stuff the body with fiberfill as you go.
Step 52
2 sc, 2 dec, 8 sc, 2 dec, 4 sc, 2 dec, 8 sc, 2 dec, 2 sc. sc, 2 dec, 6 sc, 2 dec, 2 sc, 2 dec, 6 sc, 2 dec, sc.
Step 53
2 dec, 4 sc, 4 dec, 4 sc, 2 dec. Finish off, leaving a long strand. With a wool needle, sew the opening on the last row.
Step 54
(make 2, in light yellow) Let's start with the part: Ears. 5 sc in the magic ring.
Step 55
[4 sc, inc] x 2 [5 sc, inc] x 2
Step 56
[6 sc, inc] x 2 [7 sc, inc] x 2
Step 57
Do not stuff, do not flatten the ears and finish off, leaving a long tail to sew. (make 4, in light yellow)
Step 58
Let's start with the part: Legs. 4 sc in the magic ring. 8 bp.
Step 59
[3 sc, inc] x 2 10 sc.
Step 60
Fasten off, leaving a long tail to sew. Here you have the complete translation of the last part of the pattern.
Step 61
(start in brown) Let's start with the part: Tail. 4 sc in the magic ring.
Step 62
3–4. 8 sc (2 rounds) 5–6. 2 sc, 2 sc, 2 sc, 2 hdc (2 rounds)
Step 63
2 sc, 2 sc, 2 sc, 2 hdc. 8 bp.
Step 64
9–10. 8 sc (2 rounds) 11–12. 8 sc (2 rounds)
Step 65
13–14. 8 sc (2 rounds) 15–16. 8 sc (2 rounds)
Step 66
Fasten off, leaving a long tail to sew. Sew the ears to the body between V2 and 9.
Step 67
Sew the tail to the body between V6 and 8. Sew the legs to the body between V24 and 26.
Step 68
Embroider the mouth and mustaches with black thread.